Saturday, December 28, 2013

Kobayashi Opening part 4

Secondary Sequence 2
Kobayashi Opening part 4


This is joseki popular in kobayashi openning because very easy in playing.

 
Diagram 1

In his present situation , it is obvious for white to pust at 1 , It is not good for Black to bend at 2 because he can't cut at Q7 without returning to a situation almost identicial to that in Diagram 2 or Diagram 3 and if he extend at 4, White 5 will be too good.

Diagram 2

If Black responds to White's attackment at 3 , White can get a better result because the two white stones in the cener have some possibility of being used in the future.


Diagram 3

Black won't descend at 3, as in the previous diagram,but connect at 2. Up to 5,White's shape is bad.


Kobayashi Opening Part 3

Kobayashi Part 3

Secondary Sequence 2


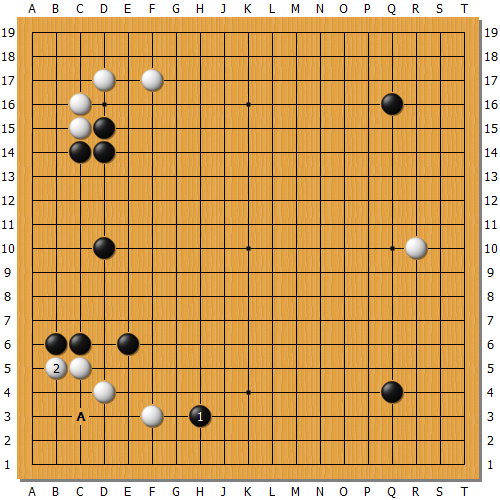
It is more modern to extend up to 1 than at R9 , thus emphasizing the center . Indeed, White 1 here appears more often than White A in modern Baduk. Black 2 and White 3 generally follow,but Black 4 is rather new. Before the advent of this move, Black just kept the lower side with 6 abd yielded sunsoo to White. By virtue of Black 4, Black can noww force White to add another stone on the left side with 7.

Diagram 1

If White omits the jump at 3 in Secondary Sequence 2 , then Black's invasion at 1 will be very fierce. Cut aprt to 5, it will be very difficult for White to settle the situation


Diagram 2

It is possible for White to respond to Black 1 with 2 if  the ladder created by the sequence Black A , White B, Black C , and White D works,but then Black will get to play a ladder breaker


Diagram 3

It is also possible for White to push at 1, but a the right time , Black can gain territorial profit with moves form 2 to 8.


Diagram 4

If White didn't protect the left side with 7 in Secondary Sequence 1 , Black 1 would be a good attack here. If White blocks at 2 , Black will come out with moves form 3 to 11 .

Diagram 5 

Continuing from the last sequence , up to 23 , Black succeeds in creating White's weaknesses at A and B.


Diagram 6

So,the best thing White can do is to push at 2. But this result is not satisfactory, either ,
 because Black will take a soid territory on the right side in sunsoo


Diagram 7

After white plays (triangle) Black can still activate his stone on the right side with 2 and 4 ,Black hollows out White's territory up to 7 .


Diagram 8

So , the strongest and best response for White is to bend solidly at 1 . When white covers the outside with 11..


Diagram 9

Although Black can capture the Whites on the side up to 13 , White doesn't need to complain because  he has sunsoo and there also remains a possibility for him to make a two step pae with A


Kobayashi Opening Part 2

Kobayashi Part2

Secondary Sequence 1

White's two-line extension is the commonest and easiest move in this situation. Black's approach at 3 is almost inevitable. White 4 is necessary,too. After Black retains the lower side with 5, 
White will turn elsewhere.


Diagram1

If Black omits the approach at A and hastily fortifies the lower side with 1 , then White 2 or B will be to good.


Diagram 2

This diagram shows why White 3 in Secondary Sequence 1 was necessary. Up to 9 Black can develop the lower side effectively. The sequence shown in this diagram is just one ofvarious possibilities that Black can choose from..


Diagram 3 

If Black likes to attack,moves 1 and 3 are good .


Diagram 4 

But Black won't be so sub-missive. He will penetrate White's dragonal gap with 1. This accords with Black
(triangle) on both side.

Kobayashi Opening Part 1

 From Jungsuk in our time 

 Kobayashi Opening


Black's position on the lower side , called the " Kobayshi Style " , was very popular about a decade ago.
White's approach at 1 is an effective way of avoding a difficult fight even though
White is in Black's sphere of influence . For example , if White approaches at A or B , Black will attack him fiercely with C.
 Black 2 is the most peaceful response to White1.


Diagram 1

This diagram shows how Black can develop a good shape by attacking White's approaching stone.


Friday, December 27, 2013

Joseki Opening (3-4) Episode 5


Seconcadary Sequence 1 


Countinuing From Primary Sequence 2 , If white invades at 1, Black must shut if off from the upper left corner with 2. White 3 intends to secure territory. Up to 12, White now has several choices. One is to steal the terriotyry on the left side with sequence from 3 to 12 After this , it will be good for Black to strengthen the center with the sequence Black A , White B , Black C, White D,and Black E


Diagram 1 

If White pushes at 1 thoughtlessly instead of playing 5 in Secondary Sequence 1 , he will be baffled Black2.


Diagram 2

Another choice is to fight with 1,3,and 5 , if white as enough pae threats.

Diagram3

If White comes up at 1 , it will be enough for Black just to respond with 2.


Diagram 4

Also , Black can turn elsewhere and give up the three stones. By sacrificing these stones, Black makes White (triangle) redundant.


Diagram 5 

It is therefore better for White to wait for a chance to move D9. Whites weakness at C6 make it hard to decide when to do it


Joseki Opening (3-4) Episode4


Primary Sequence 2  


Black 1 was played often before Primary  sequence 1came out . Because Kitani Minoru favored this particular sequence. it is called the Kitani Jungsuk White's approach'and'extension at 4 is too important to neglect because , after Black approaches at 1 as shown in Diagram1, it becomes almost impossible for White to invade  Black's territory on the left side . Black can therefore use Primary Sequence 2 to take sunsoo by use leaving his territory unprotected after white 4,but inthat case , he will face a difficult battle if white invades.


Diagram1


Joseki Opening (3-4) Episode3

Secondary Sequence 2


Continuing from Primary 1, it is also possible for  White to divide the right side with 12. Then Black's approach-and extension at 13 is good. Up to 14,Black and White have shared the board peacefully.


Diagram 1

Continuing from Secondary Sequence 2 , Black needs to jump quickly at 1 to secure his territory on the left side.


Diagram 2 

After Diagram 1,Black will aim at gouging out White's corner with 1.

Diagram 3

If Black want to build up his lower-side frame work, he will approach at 1. Black's invasion at A threatens White's basis for life , so White cannot omits 2.

If Black omits the jump in Diagram1,White's intrusion at 1 will be severe. White's counter-bending is god againts Black3.
Diagram 5

Continuing for Diagram 4,it is correct for Black to connect at 2 Up. to 8 , White has restricted both Black's territory and influence.Black's dansoo at A , instead of 7,would be a mistake , leaving potential trouble for black.

Diagram 6

Connecting at 1 instead of white 2 in Diagram 5 would make White's shape heavy.

Diagram 7

It isn't good to cut at 1 because White becomes very strong thanks to the sequence up to 6 .
Diagram8

Black 1 looks plausible. But after White makes Black's shape low and flat with 2 and 4, White's influence is worth much more than Black's territory.


Joseki Opening (3-4) Episode2


Secondary Sequence 1 


After Primary Sequence 1 , White's approach at 1 is a good move , It has recently become popular for Black to make a grand frame work with 2 . White junmps at 3 Black already has a good framework on the right side so building a wall toward the center with4 and 6 is good enough.


Secondary Sequence 1
If Black tries to block with 1 , White can get ous with 2 Black can't shut both exits at A and B


Diagram 2 

After Primary Sequence 1 , White's approach at 1 is a good move , It has recently become popular for Black to make a grand frame work with 2 . White junmps at 3 Black already has a good framework on the right side so building a wall toward the center with4 and 6 is good enough.


Diagram 3

If White jumps at 1. Black  2 is good . If White secures some territory with 3, Black will take terrioty in the corner with 4.


Diagram 4
If White doesn't invade with 3 in Secondary Sequence 1 Black 1 in this diagram is good. Up to 6 is a generally approved sequence. If White omits 6, Black will get a chance to invade at A B or C


Diagram 5

Instead og playing Black 1 in Diagram 4,Black can choose to invade at 3 after exchanging 1 and 2 . He will gain territorial profit rather than external influence.


Joseki Opening (3-4) Episode1

Sequence1 from Jungsuk in our time by Seo Boonsoo 9dan and Jung Dong sik 5 dan
Translated By Namchiyung 1 dan 

Primary Sequence 1 

In the sequence shown , from 1 to 7, White looks better than Black because he has certain territory in the corner 
But what we call  " joseki"
is a sequence from which both opponents can get well-balacnced results . If White gets a teritorial profit , Black will gain an external influence with which he can gain territory late.


About me

I am Chai Khovitoongij rank 2dan in Lampang , Thailand
I like play go and learning fuseki , joseki ,life and death , tesuji
I think create website because i want go player learning fuseki and joseki ,etc because development higher